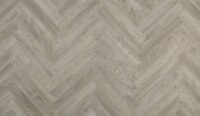
While the herringbone and chevron flooring pattern didn’t gain popularity until the 16th century in France, it’s safe to say that it has made a welcome mark in homes across the world — and for good reason.
As a symbol of status and elegance across French properties of the past, it only makes sense that herringbone flooring has become a sought-after flooring design in the UK, too. But how do you lay herringbone laminate wood flooring effectively? Read on to find out.
Which tools and equipment do you need to lay laminate herringbone flooring?
Before fitting your laminate flooring, it’s important to have the right tools and equipment on hand. But which items do you need for your laminate herringbone flooring installation and why?
Essential
- Straight edge: Essential for achieving straight and uniform cuts on your laminate planks. The result? A satisfying fit and pattern.
- Laminate flooring underlay: A laminate flooring underlay will provide cushioning, reduce noise, and enhance your floor’s moisture resistance.
- Laminate flooring cutter: More efficient and produces less mess than a saw, a cutter is ideal for indoor use where precision is necessary.
- Square ruler: To ensure that all of your cuts are aligned correctly at the right angle.
- Floor spacers: These help you maintain the gaps necessary for expansion and contraction due to temperature changes.
- Tape measure: To measure your room of choice and the laminate planks.
- Pencil: This will ensure your cutting lines are as precise as possible.
Optional
- Jigsaw tool: There may be some places where your cutter can’t handle, such as door frames. In these scenarios, a jigsaw tool can cut your laminate planks in more intricate angles.
- PVA adhesive: You may require some PVA to glue the joints of your laminate planks and reduce movement.
- Knee pads: When installing your herringbone flooring, your knees will be in action for a lot of the process. Knee pads can offer comfort and support.
- Sandpaper or a sanding tool: To clean up the edges and smooth the planks after cutting.
How to install herringbone laminate flooring
Before starting the installation, ensure your floor is clean, dry, and level. Set down your chosen laminate floor underlay, and then it’s time to plan your herringbone flooring layout. Consider the room’s dimensions and the pattern’s focal point to ensure it flows symmetrically across the room.
Step 1: Cutting the laminate
Firstly, let’s look at how to cut your laminate flooring. Measure and mark your laminate planks for cutting, allowing for an expansion gap around the room’s perimeter. Use a laminate flooring cutter for straight cuts or a jigsaw for intricate shapes. It’s important to ensure that each piece fits perfectly within the herringbone pattern, adjusting cuts as necessary for a precise fit.
After cutting, it’s common to find small fragments or rough edges around the planks. Gently sand these areas if necessary to smooth them out, being careful not to damage the laminate surface.
Step 2: Installation
Begin by laying your planks from the room’s focal point, fitting the first plank at a 45-degree angle to the wall. Continue by adding the planks in alternating directions to create the herringbone pattern.
Remember to always secure the planks together according to the manufacturer’s instructions and the relevant laminate flooring accessories, which may involve using PVA adhesive for a more secure fit.
Step 3: Finishing touches
Once you’re happy with the layout, remove the spacers and install baseboards or trim to cover the expansion gap while allowing for movement. You can always use transition strips where the laminate meets other flooring types or doorways to provide a smooth transition if need be.
Finally, clean your new floor with a soft-bristled broom or a damp mop suitable for laminate flooring to remove any excess debris.
Can you fit herringbone flooring by yourself?
If you feel confident enough to fit the flooring then there’s no reason why not! However, we’d recommend investing in protective equipment such as goggles and cut-resistant gloves to ensure safety at all times. You might also benefit from ear defenders if you’re using a sander or jigsaw.
If you don’t feel confident in your DIY skills, there’s no harm in seeking a professional to help you out. Our team at A Wood Idea is also always available to contact if you need extra advice or guidance.
Why is herringbone flooring so popular?
Also known as ‘parquet flooring’, herringbone is a popular flooring pattern, due to its elegance and style. It’s satisfying to look at and adds a touch of character to any room.
Laminate wood flooring planks are ideal for herringbone flooring designs due to their variety and versatility. From the eye-catching sheen of high-gloss laminate flooring to its similarities to natural wood, you can pick laminate planks in a variety of colours such as oak, light brown, marbau brown, and walnut.
Add a whimsical aesthetic to your hallways or dining areas with a natural light finish laminate, or use darker tones to provide a striking contrast.
Make your herringbone flooring dream a reality with A Wood Idea
At A Wood Idea, we stock a range of herringbone laminate flooring products for you to choose from, offering an attractive and elegant yet low-maintenance look.
Shop our range of herringbone laminate flooring options and feel free to get in touch if you have any questions.